Slider_JavaScript

Showing posts with label DIY. Show all posts

Retirement (with Raspberries)

Thursday, October 27, 2016

Man, have I missed you guys!! I can honestly say that for a while there (and it was a long, long, LONG while), I was beginning to wonder if I would ever make it back here - talk about insanity squared! I have really been struggling to find some kind of balance (and sadly, I'm still not there :oP For whatever reason, this school year has been particularly brutal, with a hectic pace throughout every period and classes scattered all over campus. By the end of the day, I am absolutely fried and frequently catch myself just staring blankly at the wall trying to drum up enough energy to make it to the car and drive home. I don't have much computer access compared to last year either, so my ability to write a post in small snippets over the course of a few days to a week is blown. To compound matters even further, DH has done The Deed. He is officially Retired (though I'll cop to saying it Ree-taard on a regular basis ;o) For those of you wondering what on earth that has to do with my ability to write a blog post, well let me tell you...
Photo Inset: Taya, who looks tubby enough to rate her own zip code.

DH retired the very same day I went back to work. He decided to wait a few months to look for something to do part time; choosing instead to relax and hang out at home. All. The. Time. Since then, he has gained magic skills to rival those of David Copperfield. I have yet to figure out how the man can be in every room of the entire house at the same time, but he is. Clean laundry in hand, I'll zip by him kicked back in the recliner snoring er, watching the news in the family room, only to have him scare the pants off me two minutes later when I plow right into him as I leave the bedroom closet. Sometimes he forgoes the teleporting and just follows me all over the house. Drives me batty. Pretty sure I threatened bodily injury at one point. Now don't misunderstand me; I love my husband, but the man is in desperate need of a hobby, a job, something (anything!) that gets him out of the house [read: my hair] once in awhile. If I pick up the laptop to try to work on the blog at home, he suddenly has a list of 42 things he forgot to tell me. If it's not that, he has a completely different list of things he'd like me to look up for him on the internet. Exciting things; like tractor or truck part numbers and mechanical how to's. *yawn*

Then DH got a phone call with some wonderful news - his/our friend Ron, was moving back to the area. You may know Ron better by his nickname: Brains (this post). I shall now state the obvious: Brawn has proven to be largely incapable of functioning without Brains. Although DH has made a few attempts at tackling all the things he was going to get to when he "ree-tard", he hasn't made much  in the way of a dent so far. Hopefully, now that his brain is back where it belongs, things will start to pick up. Well, maybe ;o)

Some other good news? After all the cooking and cleaning up of Thanksgiving Day was over, I actually managed to stuff in (get it? ba-dump-bump ;o) some Christmas DIYs. I was only able to work in fits and starts, so I didn't have time to do a fun little series of photos as things progressed - apologies!! I don't know about you, but I always like to watch things come together. Anyhoo, I have a close friend (who has had a lot of challenging things going on in her life), and she and I have had many discussions about choosing to be joyful as a Christian - something that is a lot harder than you'd think. At some point, she told me she had put little signs up all over her house to remind herself to "choose joy". Isn't that a great idea? Thinking it would be neat to incorporate it into Christmas, I dug through my thrift/craft store inventory to see what I could find. I already had most everything on hand, but made a gun run to Hobby Lobby for some unpainted .99c letters.

As someone whose default mode is too often of the gloom and doom variety, I loved the idea of a visual reminder. This version is also aesthetically more pleasing than having it tattooed backwards on my forehead (something I have periodically considered ;o) I wanted to add a little "joyful" reminder to our holiday decor this year (mostly because it popped into my head as I was putting up decorations). Funny that I just happened to have those three (totally tacky) little wooden plaques on hand from the '70's that I picked up at a thrift shop... somewhere. Scrounging through my hardware bin I hit paydirt with (would you believe it?) three little decorative hangers. Slap on the paint, glue on some Christmas scrapbook paper, add the letters, some ribbon, some more ribbon, the peel-n-stick felt backing so it won't kill the walls, and... Ta Da! A fun and festive reminder to myself to choose joy. Not quite finished, but getting there!

Have you guys seen the recycled picture frame wreaths? They're very different, and I just love them! I'd never even heard of them until I stumbled across one on Pinterest (yes, I know, I really need to stay away from there). It just so happened that I knew of an OTD frame (older-than-dirt) that had been decomposing  *Ahem* languishing in our garage (for the past twenty years). It was a big, gorgeously ornate frame that came from the living room of my childhood home. It was fabulous, but far and away too fancy-schmancy for our house. I was so excited to finally have a purpose for it! After cleaning it up and adding some scrap wood to the back for stability, I gave it a hefty coat of some pretty gold spraypaint. It had quite a bit of damage down the left side, but that just made the decision of where to put the greenery an easy one. I'll have the finished photos for you next time. Lord willing, it won't take me anywhere near as long to get to that post ;o)

I have one more Christmas idea that I'm playing with, but I think I'll save that one for next time too (goodness knows, I've yammered more than enough this time, right? ;o) As always, thank you so much for reading this far and have a blessed day!


Infatuation, Irrigation and a DIY Extravaganza

Saturday, July 9, 2016

Pinterest is a VERY dangerous place. It's one of those sites that's like a ginormous black hole in cyberspace. First comes the infatuation, then the gravitation; and once you hit that gravitational pull? Ha. WOOSH! It sucks you right in and the next thing you know it's five hours later. Nothing on your list has gotten done, but hey! you've now discovered 500 new and wondrous things to add to a brand new board full of "schtuff" you totally have to do. In your spare time. Of which you have none. Right then. Idiot. *facepalm* On top of that, you're now horribly late for something you completely forgot about and (to make things more interesting) your derriere has fallen fast asleep in the chair. Sometimes I think I need professional help. Do you do stuff like that? To top it off, Pinterest has now started sending me "ideas I might like". To date, that has generated a short squeal of fear and and immediate deletion of the notification (but it's rapidly becoming a growing challenge not to at least take a peek). Although I've managed to accomplish a handful of things I've seen indoors and out; like the repurposed wheelbarrow (here), and the jazzing up of my light switches (here), there are - literally - hundreds more and me with medium-rare motivation (though I do have my moments ;o)

On the one hand, I have come up with some really neat ideas that were inspired by things I came across on Pinterest. On the other? Well, I have figured out I definitely need to sprout way more hands than two if I want to achieve even a microscopic portion of all the things I've gleefully pinned. One of the pins (site here) I came across that I really, really, liked was using recycled water bottles to create a root watering system for plants. They also introduced me to the "plant nanny" which I'll explain further down. Since we all know Jen can't leave anything alone, I had to put my own creative spin on it. I don't drink bottled water anymore but I do drink juice, so I started saving the big bottles. DH enjoys a glass of wine in the evenings, so I started saving those bottles too. You know, in case I came across something else that they would come in handy for (and is it any wonder my house is terminally cluttered?) Turns out I did find a great use for them. Several, actually. Mmmph.

For the juice bottles, I poked two tiny holes on the plant side at the very bottom and buried them a short distance from the plant. I filled them with water, and went on my merry way.  Checking the water levels every day got annoying in very short order (I couldn't tell where the line was, so I had to open each one to check). Tedious and time-consuming. Grr. Nope, not happening. As much as I hated the neon orange, it was easily solved with some inexpensive fishing bobbers. Now I can see where the water line is from just about anywhere I stand. I also didn't like the yellow caps on the bottles. Since they don't need to be tight, I opted to swap them out for some plain white ones from empty supplement bottles (thankfully, that idea hit just as I was about to throw several empties in the trash). Since we have a more rustic theme in the back, I went with black caps back there. Then I spent some time wondering how I could jazz up the tops a bit more. I didn't like all of that "sameness". I mean, it's not like I could just LEAVE IT ALONE, right? Yeesh. Painting was too much trouble, and any embellishment glued on there would probably just fall off. Then I thought about all those spectacular cabinet knobs at Hobby Lobby. You know, the ones they regularly put on sale for half price? Not only would they add something unique to my gardens, it would make it easier to handle the tops. WOO! Now we're talking!

I had a field day picking up decorative knobs over the past few months - I tried to stick with porcelain and other things I thought would (I hope) survive outside. Here's what they look like:


Although the juice bottle idea worked like a charm in the supersized planters and flowerbeds, I still had a number of smaller planters scattered everywhere. As much as I love my plants, it will be tough to keep up with it all once reality sets back in (back to school) at the end of the month. Enter the nifty little invention I mentioned earlier: the "plant nanny". It's a terra cotta spike that will hold large bottles in an inverted position; since terra cotta is porous, it allows the water to seep slowly into the roots. An automated potted plant watering system? Boo-Yeah. Now we're talking! (See? I knew I should totally save all those wine bottles ;o) If you click on the picture to blow it up, you can just see the top of the spike in the soil. The downside (of course there had to be one) is that they are hideously expensive at around $20 for a box of four. *gulp*  I found one that was a little less; I think it was called the "plant minder" or something like that anyway.

I still had the other half of DD's crib; the first end being ensconced by the front beds (here) and its springs adorning the wall outside the feed room (here). I decided the shape of the crib end might make a neat little backbone piece for a potting area of sorts.  After searching until my eyeballs bled, I opted to "go it alone" and make some kind of a small stand to use on the patio. I painted the crib end a nice rustic red and just stared at it for awhile. Walked around it. I'm pretty sure I burned up quite a few brain cells pondering and percolating, as I eyeballed it from all angles. In order to keep things complicated, I also tried to make use of multiple leftovers from other P-words (projects). There might have been a day or two where I was absolutely certain that DIY actually stood for, "Delusional Is YOU" and nobody ever told me that's what it really meant. Eventually I got it all figured out right down to the small rolled up piece of leftover chicken wire I kept moving around to get it out of the way (you know the thing, it's too small to use for anything, but too big to throw away?). Hobby Lobby put their Spring Shop items on sale at 66% off, and I made a beeline for some fabulous art deco brackets (photo) that I had been drooling over (they wound up being $5.44 each - WHOOP! :o) I also found a decorative piece with multiple hooks for half price to hang my tools and gloves. I chose to hang it improperly, of course, with part of it sticking up above the top of the crib end. It gave it a nice finished look - at least I thought it did.


It was really hard to get a clear picture with the patio all shady and so much light behind it. Even though it was raining, the light was too much and I wound up taking flash pictures which made the color look a little funky. The photo below is a bit better. Overall, I was delighted with the way it turned out, although I may need to go back and paint those bottom pieces...


I bolted it to the post behind it for stability, since it only has two legs. It's pretty unobtrusive, which I like (I'll have a real potting bench in the garage eventually - It's on The List. *eyeroll*). I just needed a small space to store gardening things and somewhere to pot up any cuttings I might have to share with our visitors. The chicken wire (though annoying) added a bit of rustic flair. It also meant that I got rid of something else that was laying around - Hooray!!


Even though I had to add a scrap piece of 2x4 behind it to make it work (the leftover shelf piece was too narrow for the brackets) I decided the raised shelf in the back worked great for smaller garden related items. Things like an old spice jar full of eggshells for new plantings, plant tags to label shared cuttings (held in one of DD's wood practice pieces from college), and a little pot with all the informational thingies from my plants and flowers, among other things.


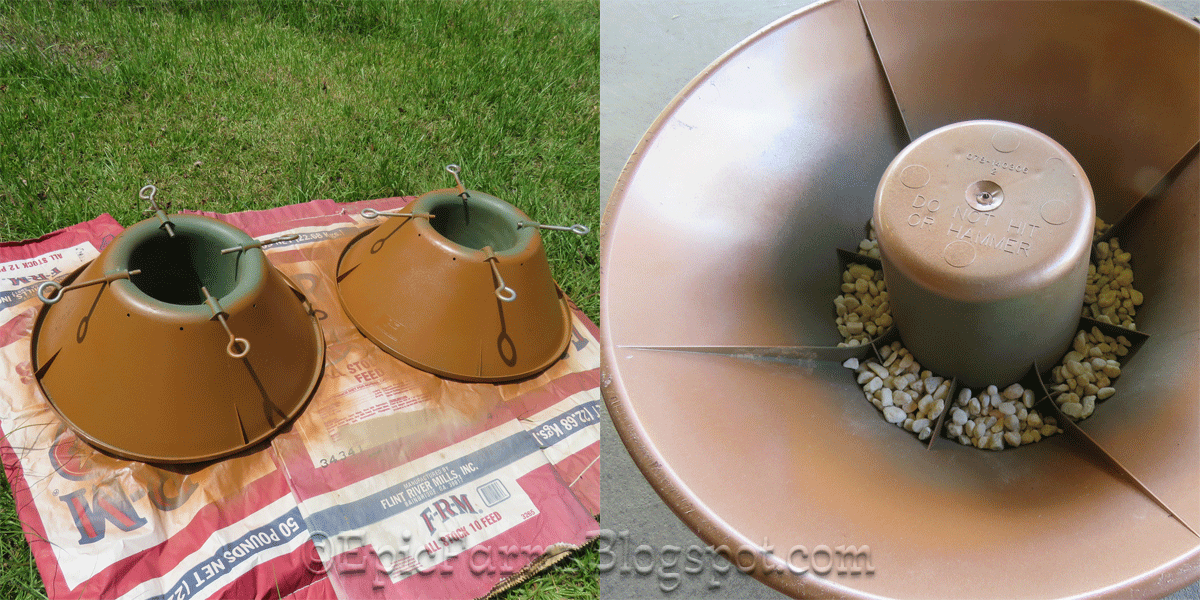
Next to the potting stand, one of my favorite MSU's (make somethin' up ;o) so far this year has to be the butterfly bath planters. I had two old Christmas tree stands sitting in the garage. I think I spent about two months just looking at them. I knew I could use them "as is" for planters, but I didn't really like it that way. They took up too much room for one thing (too clunky) and, well, I just didn't like it. At some point, I flipped them over and stared a bit more before the AHA moment hit (don't you love those?) I could plant multiple plants in it if I turned it upside down. A handy bonus? The extra large eye bolts used to stabilize the tree in the stand would offer some additional stability in its inverted position. Initially, I thought to put a flowerpot on the center "shelf" creating a tiered look, but then inspiration struck again and I decided to use a flowerpot saucer to make a butterfly and bee bath instead. To paraphrase what's-his-face from the A-Team, "I love it when a plan[ter] comes together". Bwahahaha. *snort* Yeah, I know, I'm corny and my age is showing :oP


I drilled some holes for drainage, got out my trusty spray paint and went to town (again, with the less expensive base coat followed by the outdoor metallic paint). Some sparkly paint and stepping stones for the bees and the butterflies coming right up!


Since bees and butterflies can drown (and garden lifeguards are in short supply), some pretty pieces of hexagonal glass from Hobby Lobby made the perfect stepping stone. My friendly neighborhood feed store (Ace is the place ;o) was nice enough to put some $2 flats of Gaillardia right by the door where I'd trip over them on my feed run and.... Viola! Do you like it?


It will look better, I'm sure, when the flowers "fill in" a little bit more. SO...I'm pretty sure that's more than enough for now. I'm all talked out, and I'll just bet you're tired of reading (or you fudged it and mostly just looked at the pictures ;o) If you're a picture person, feel free to look us up on Instagram (there's a shot of our very first visitor to the butterfly bath on there). Have a wonderful weekend and a beautifully blessed week!


A Bender of EPIC proportions...

Sunday, January 24, 2016

Sooooo... I couldn't quite pull off the pre-holiday post or the post-holiday post, (ha) for that matter. Actually, if I'm going to be completely honest, I didn't even come close (although I thought about you often!). Since we're already well into the new year, I thought I should probably at least attempt to say something. You know, lest you all think I tumbled off the proverbial cliff, or - more likely - ran screaming into the hills to hide from the overwhelming number of unfinished Projects (excuse me for swearing ;o) towering stacks of [unpacked/unsorted] boxes, and [unfiled] paper piles hills mountains that have haunted me for the past several years. What I always find surprising [okay, annoying] is how incredibly difficult it is to get things to "line up" in a way that is conducive to any kind of serious productivity when you're finally on the upswing. [Photo inset: I varnished and added a shelf I uncovered Er, we had laying around, to the Family Room half bath with some things from my overcrowded bookshelves: A really [really-really] old prescription box and a hand-painted chair from Spain that was my grandmothers (because the colors worked). Then I printed and framed a vintage toilet water advertisement from my collection that had nicely coordinating colors (plus, it seemed apropos ;o) I found the family sign for half price at Hobby Lobby - love that store! - and put it there because it covered up the two anchors from the towel bar that hung there when it was a full bath.]

Over the past couple of years, since my health has started improving, it's seemed more likely to negotiate a succinct document out of a bunch of Louisiana lawyers - or attain complete compromise amidst a boatload of Washington politicians - than be able to find the time (and have enough energy) to get anything done on the home front. I always thought I had trouble keeping up with those things before I got sick; after? Well it just got ridiculous. And, to complete this towering challenge, we'll toss in a handful of inconsiderate individuals who were happy to compound the issue. Nobody can stick it to you quite as well as family can, right? Shockingly, however, the planets lined up, the stars sparkled, and Jen had an actual energy spurt over the Christmas holidays. I took a page out of my dad's book to make it happen (finding myself "limit up" over his constant criticism at the clean-but-cluttered state of my house), so I ignored everyone and everything in favor of my own agenda during the break. Even the evil 'Itis twins managed to toe the line for the most part (To wit: Arthur and Bursa), leaving me physically able to rise to the challenge. Though I think that was more compliments of the weirdly warm temperatures, than anything else. I'll take what I can get though, you know? ;o)

In addition to barreling through box loads and filing more papers than aforementioned attorneys, I've somehow managed to simultaneously catch the Pinterest bug and have also found myself subject to some [super simple] DIY-on-a-budget fits. Necessary? Pretty much, since we were suddenly interrupted by life before we could completely finish our remodel/redecorating (and as I mentioned, that part goes back to waaaay before I got sick *insert eyeroll here*). Fun? Definitely. Though I'm not sure I needed any more "P-words" floating around in various stages of completion. *sigh* There are an amazing number of fantastic ideas out there in cyberspace, and I've got to admit that Pinterest is probably the best bang for your buck (so to speak, anyway, since it's free to see for you and me *laugh* ;o) I'm posting some pictures of my DIY's so far (although the one at the very beginning of the post was home grown).

I have a large framed puzzle DD and I did together (which desperately needs glass) in the Family Room half bath that makes the colors all blend beautifully. The lightswitch in there, though practical, was a cheesy plastic one and I hated it. Since it was fitted inside the paneling, I couldn't easily replace it. Too bad I had no clue at the time that the electrical box could actually be brought forward to the edge of the paneling so I wouldn't have had to do it the way I did. Oh well. Enter Pinterest, and the cover your ugly switchplate with scrapbook paper idea. WOO-HOO! and Perfectomundo! It's very heavy paper and I sprayed the mess out of it with clear coat on top of the Mod Podge, so here's hoping for a long and happy life....


Below is the last puzzle DD and I put together before she left us (there are several we've done over the years in different frames scattered throughout the house). Since there was a rather annoying blank wall in the hallway-wannabee area on the way out to the tacky room, I thought this might spice it up a bit. I couldn't get a straight on shot, as there is a wall in the way. Oh! and a huge thank you to Lori, who gave me the "rustic-ready" frame instead of tossing it in the trash ;o) I had to trim the top and sides of the puzzle to make it fit - which took forever - but I love it! Do you ever decorate with puzzles?


My mom and I were working on hanging the dining room wallpaper when the first big life interruption occurred: her breast cancer diagnosis at age 65 (mom's now 80, so that should give you a pretty good idea of just how long all of this has dragged out *wince*). Things kind of spiraled (downward) from there when my grandmother came to live with us. Hopefully, I'll be able to find somebody, somewhere, who is incredibly bored and might be willing to help me finish it next summer. That's the plan anyway, but I digress. Although I already had a wide rod, I had no curtain. Can't say I care for the mini-blind look (it's very.... Meh). Found tons of good ideas for "no-sew curtains", but was ecstatic when I came across one using cloth napkins. How awesome is that? And who'd-a thunk it? (not me, that's for sure). Happily, I had some beautiful blue embroidered napkins that belonged to my grandmother tucked away in a drawer. I love the matching tablecloth [Photo inset] and use it all the time, just not the napkins which have to be washed and ironed after use (and are you kidding me?). The tablecloth is not actually shiny; I covered it with clear vinyl. It was done in self-defense (Mom spills a LOT of stuff). Check it out (please ignore the area that shouts "screeching halt" on the wallpaper above the window):


Ta Da! Like it? Unfortunately, both of the little plastic thinga-ma-bob-its broke when I put the rod up, so it's barely hanging up there (as in...nobody breathe!). Can you say marginal, defective, weak and cheap? It was brand new! *snarl* Wasn't too keen on the exposed ends though; really ugly.Took me awhile to figure out what to do about it, but I finally came up with a plan (which I will share in a future post). I've already bought the things I need to "fix" it, but now that school's back in I don't have the time I need to do it. Hmmm...isn't this exactly where we came in?!? Yeesh. *facepalm*

The one that had me turning cartwheels, however, was the switch plate frame it fix. I love, Love, LOVE, those fancy-schmancy decorative light switch covers. Unfortunately they can be extremely expensive (though if you have a Hobby Lobby anywhere near you, they do 50% off sales on switch plate covers periodically :o) I also happen to be a serious frame addict, and have picture frames of all shapes and sizes I've bought for next to nothing at flea markets and second-hand shops all over everywhere. One of my favorites? A 5" x 7" frame with a fabulous vine-like border of metal leaves and acorns. It cost me a whopping .50¢ (don'tcha just love those??). I also had an old wooden light switch cover in my "electrical stuff" box. Never would have thought of this one on my own either!

DH got into the spirit of things right along with me and cut the wooden switchplate to fit inside the frame. I re-glued the metal piece on the back, glued the seam and covered it with electrical tape, and then painted it a [rather poopy] shade of brown to match the frame:


After it dried, I took a fan brush and some antique bronze craft paint and dry brushed it (well, I tried to anyway) and... Viola!


So? What do you think? I even painted the plain mission-style cover on the other side of the living room next - it's by the fireplace - to jazz it up a bit.  I hit with Rustoleum's Hammered Copper. Looks absolutely perfect underneath the Psalm 40:2 tile my friend Lori gave me :o) My only issue with the whole switchplate cover thing has been that Joe Contractor (whoever built the house) clearly had a crick in his neck when he installed the electrical boxes; I'm guessing he opted out on the whole "Is it level" thing, too because they're all crooked. Sadly, the framing really makes it show. Raspberries!
On top of all the cleaning and DIY-ing, I've also been working on lesson plans for the farm programs (betcha everyone thinks I've forgotten all about the point and purpose of the farm, but I'm still working away on things there as well!). I think, though, I'll save the rest of what I have to share for later ('cause boy-oh-boy did this post get long - ACK!)

Have a blessed week everyone!!


Red Book, Blue Book, Old Book, New Book

Saturday, October 10, 2015

**Coffee and a Donut Post**

Since it's [almost] National Book Week, I thought I'd make books the subject of this week's post. As a self-confessed bibliophile, I readily admit to having no less than eight (yes, 8) bookcases scattered throughout the house literally brimming with books (I suppose one might say I've got a home full of tomes *snicker*). This includes - as indicated by the post title - books by Dr. Seuss. I mean, what self-respecting book-a-holic could miss out on that marvelous cadence of his? Anytime I find a topic I am interested in pursuing, the first thing I do is look for a book or two (maybe three) depending on the subject. I have books on drawing, painting, crocheting, tatting, various crafts (I'd bet Ann's got more), gardening, animals, birds (though probably not as many as Anni), nature, and using essential oils and herbs, and a bazillion other subjects. When we remodeled our house, my dad and I made three 7' built-in bookcases [pictured] for the master bedroom, where I keep most of my fictional reading.  Believe it or not, we used 5" baseboard molding for the shelves. It has a marvelous finished edge and it's the perfect width for paperbacks (in the event that there are any other DIY bibliophiles out there ;o)

I have multiple dictionaries from the picture kind to unabridged. I've hung on to them, even though I tend to use my phone most of the time these days. Then there is the recreational reading for all ages, as well as a plethora of horse books; big shocker there, right? (ummm..... maybe not so much). Thankfully, there is a terrific used bookstore located a few miles away that takes trades (barring that, Ebay is a great used book resource). The store is actually an old house, and they have books piled to the ceiling in every room. Love it! I often walk (sometimes skip) away with a great big stack of books for $5.  I think that's a good thing. Well, most of the time anyway; except when it comes time to dust. Then I might not be quite so excited (although I must say that a super duper shop vac with a brush attachment is a wondermous thing ;o) 
[Photo Inset: A few of my dictionaries - can't have too many, don'tcha know]

A Kindle for Christmas several years ago added a whole new dimension to my library. Crazy to think you can fit somewhere in the neighborhood of 2,500 books in something that is less than half an inch thick and fits neatly in your purse, isn't it? Toss in an app for my phone and I suddenly no longer cared about having to stand in line anywhere. Why should I? I've got a book to read while I wait. One of the best things I discovered was earlier this year: Book Bub. Have you heard of it? For those of you who haven't, it is AWESOME. Book Bub puts out a daily email containing a list of free and reduced price books in a variety of genres. Maybe about ten at a time? Never counted. Anyhoo, most of them are for a limited time only (so get 'em while the gettin's good!). I have found a number of books by my favorite authors (usually the first in a series) as well as tons of new authors that I had never heard of for free. Free! For someone who cannot afford to fully fund her voracious reading habit - I have been known to blow through an entire series in one week when school is out - this is very exciting stuff. Plus, I'm not much of a gambler when it comes to test driving new authors with my money. It only took a couple of truly terrible reads - that had great sounding "blurbs" on the cover - to discourage me from buying unknown authors in the future. Did I mention that some of the books were free? Throw in the ability to "shelve" the books on Amazon when my phone library is full, and I wind up with digital shelf space akin to that of the New York City Library; AND it all fits in my pocket! *squeeee*
[Photo Inset: Part of my Karen Kingsbury collection - she is one of my favorite authors; even if she does make me cry.]

Of course one of my favorite topics to read both recreationally AND for research is horses, of courses! Although there are a number of excellent training resources out there for working with horses, I think my favorite "go to" thought provoking people for training (though I much prefer to call it "playing with purpose" ;o) are Klaus Ferdinand Hempfling and Mark Rachid. Before I stumbled upon their writings, I had been pulling a little of this and a little of that from various trainers and making my own little pot luck version. The one thing that really bugged me, however, was the cookie cutter methods used in horse training; the "one size fits all" approach. Yes, some things do remain constant in training, but all of them? Surely not. Maybe because I viewed our horses as a collection of individuals, rather than a "herd" of horses. Individuals with their own unique personalities and interests. I'm sure the same is true for dogs and other animals as well. Right?
Both men push you to think about things that most horse people never stop to consider. Hempfling pointed out that the traditional round pen led to disoriention (page 69 Dancing with Horses), just as staying in a round room for an extended period of time would ultimately disorient us. This made total sense to me and is the reason we built square and rectangular training areas. Rachid introduced the concept of "Passive Leadership" (Horses Never Lie) which placed emphasis on becoming your horse's chosen leader as opposed to their alpha. Revolutionary stuff to someone who was raised on the "show 'em who's boss" method of riding (a role I was never comfortable in). Though I've read all his books, Rachid doesn't come this far east to do clinics. Kate at A Year with Horses has been kind enough to share her own experiences at his clinics with those of us less fortunate; she has a whole list of them on the right-hand side of the blog (the lucky heifer ;o)
[Photo Inset: One of several horsey shelves; complete with childhood Breyer #68 Legionario III]

Wondering how I became such a big reader? Aside from genetics which predisposed me toward right brain-ism (mom was an English major and dad a Journalism major; they met working at a newspaper - he was her editor) growing up we spent five weeks out of each summer at the beach; our annual family vacation. Believe it or not, there was no T.V. - at all - for five whole weeks. Shocking, but true and possibly the best thing my parents ever did for me. Once the sun went down there wasn't a whole lot do there (one small store and an ice cream parlor), and you can only play so many board games. *laugh* DH, who is a total news and reality TV junkie, cannot fathom why I readily ignore the tube in favor a good read  - poor guy ;o) This photo is of one of my childhood books (published in 1964). It is "Alice's Adventures Underground" and is a facsimile of Carroll's original manuscript complete with illustrations and slipcover. Yes, the pages shown below really are yellowed with age (and let's not even go there). Pretty neat, eh? I always loved the silly poem about Father William. Of course now I wonder what his teachers had to say about his penmanship. *laugh* (control+ will make it larger if you need to):


How about you? Are you a big reader too? Thank you so much for sticking with me and reading this far! *wink* Have a blessed week y'all!


When Opportunity Knocks: ANSWER THE DOOR, DUMMY!

Saturday, June 20, 2015


**Coffee and a Donut post**

A little over a year or so ago my mom started going to a watercolor painting class every week. My dad thought it would be a fun thing for her to do; possibly helpful as well since she had been diagnosed with Dementia. He was so right - she absolutely loves it! Although retired my dad is a busy guy, so in an effort to pitch in and give him a break (albeit a small one), I offered to run by the class each week to pick up mom and bring her home; then he could run some errands or do whatever he needed to do during that time. Since he was staying there with her - trying to work from a chair in the studio - I thought it would at least buy him an extra hour or so's worth of [more comfortable] productivity each week.
Now I'll cop to a teensy bit of wishful thinking here, as painting (and I do NOT mean the walls in the house ;o) has been a dream of mine since forever, though I've never made mention of this to my dad or anyone else. I figured if I sat there and paid attention to Mom's lessons, I might even learn something. Photo inset: Isn't that the coolest door? I loved the peeling paint, weathered look, and the overall symmetry of it. This is a local church, and one of my "Scripture Pictures" (to wit: Rev 3:20 "Behold, I stand at the door and knock...")

I was an art major in high school and we did all kinds of different things, but we never covered painting. I guess because it was too expensive; it certainly couldn't have been the mess, as we made some spectacular ones on a regular basis. In any case, I was not allowed to pursue art beyond high school (long story, that) and I gave it up completely after I graduated. Well, until my cancer diagnosis, that is (more on that whole story here, if you're interested). Although I did attempt to learn to paint on my own, it was a little too complicated for me figure out without professional help (so I just went back to my faithful friends - #2 Pencil & Company ;o) I did manage to create one halfway decent work with watercolor pencils [photo inset] and a whole boatload of "Meh" before I gave it up in frustration.

After I had picked up and delivered mom a few times, my dad and I had the following conversation:

Dad: You know, if you're going to go get your mom every week you should probably just take the class with her.
Me [rolling my eyes and laughing]: Yes, well. That'd be great there, Pop, but I'm afraid extravagances like art classes don't exactly run around in my reality.
Dad [shrugging]: We'll pay for it.
Me [horrified]: Oh my goodness, that's not what I meant at ALL! No, no, no, I couldn't let you do that. It's way too much!
Dad: I'd be happy to do it. You're going there every week anyway; you might even enjoy it.
Me [backpedaling]: Well I'm sure I would, but I don't want you to feel like you have to do that. I'm happy to just pick her up for you. Really, I am. I don't mind it at all. Honest!
Dad [in exasperation]: LOOK. We may not be rolling in it, but we can certainly afford to do this for you. You know that.
Me [now sputtering]: Well, yes...Maybe, but...Well, I...I mean, you can't...I couldn't... it's just SO much... 
Dad [eyeing me strangely]: I don't see the problem. You like art, I know you do. We want to do this; I know good and well you'd enjoy it. Besides, are you seriously going to keep arguing with me about it?
Me [having a major V-8 moment]: Uh... No. No, I'm not. Not at all, actually. I think I'm done being an idiot. Mostly, anyway. THANK YOU, Pop!
I guess this might sound a bit silly, but I actually cried a few happy tears in the car on my way home. (I mean honestly, what's a girl to do when she's overwhelmed by an out of the blue blessing like that, you know? :o)

Not sure why, but after the first two or three sessions, I decided to start keeping up with the weekly progress on my third painting of a Nandina (done from a photograph of a bush behind the house that was taken a long time ago). My second painting (a Rose of Sharon) is in the blog slider above. The first one may (or may not) ever see the light of day. I have a LOT to learn, and I am incredibly slow. I did do my sketch at home (seemed wasteful do use class time for that, since I can at least draw all by myself ;o) Each slide change is one class; it took me about 23 or 24 weeks to finish this. I told you I was slow. *laugh* Disclaimer: In my defense, I didn't know I was going to share these, so the cell phone photos are not the best (#3 is simply dreadful):
...

And now for an update on the "P" word (project). I'll bet you thought I forgot all about it, didn't you? Surprisingly, I didn't (though maybe shockingly would be the more appropriate adverb ;o) We definitely needed somewhere for our visitors to wash up after petting the ponies (or using the outhouse), and decided to go with your basic el-cheapo laundry tub. Not only was it basic, it was also incredibly booooring. Added to that, of course, was how utterly ridiculous a blinding white sink looked with the rustic theme we had going on (remember my potty post?) Plus anyone with an ounce of brain cell knows that while it is all shiny and white and pretty right now, it certainly isn't going to stay that way. As if all that were not enough already, don't we all know by now that Jennifer just can't leave such things alone? [Cue eye roll and dramatic, self-deprecating sigh] I decided to paint it, but with what? For the outside I knew I could use outdoor paint made specifically for plastic, but what about the inside? I decided to try Leak Seal (the stuff you put on your gutters). It's made for outdoor use and it's tough (at least I hope it is). Wasn't sure if it would work or not, but it looks like it just might do the trick. *WOOT* I started with the bottom, which still needs another coat or two...
...and then I went for the interior and top portion. So far so good, but it definitely will need another coat of Leak Seal (this was the whole can).
Hopefully, I'll have some "all finished" photos for you in the near future :o) I also [FINALLY] started painting the spectacular wood cutout DD made for me (which was longer ago than I care to acknowledge *laugh*):
I might have gotten just a little bit sidetracked somewhere in the middle of all that to play with some dangling Zenspirations (this info's for my creatively crafty blogging buddy, Ann ;o) to spice up a birthday bag for my friend Kimby. I'll tell you all about her next week - she's amazing! Not my best work, but it was a lot harder to doodle on that bumpy bag than I thought it would be (plus the .07 pen was a bit too thick for my liking - .03 worked much better). Sure was fun though!

I'll be adding something new here called a "Random Moment" periodically. Sometimes I have something I learned or came across that I want to share with you, but it's often short and not relevant to whatever I'm talking about at the time (that's so very... Me: not relevant - HA). Anyhoo, here's the first one:

Random Moment: Paper Karma is the most marvelous app! I guess you could call it the postal version of "Do Not Call". I know one thing; it cut our junk mail down to almost nothing. We had an unbelievable deluge of "spammy" snail mail and credit card offers every single day; it drove me bonkers tearing them all up (can't just toss it all because now they plaster your name all over it and you have to worry about identity theft don'tcha know). Now we barely get a handful all week. Hooray!! Find it on Google Play here, and iTunes here. It really does work!

Thank you for reading so [very, very] far this week; have a blessed day y'all!


OH-OH-OH! Did you see what Carrie did for me? Check out my new little ray of sunshine in the comment part below (I'm telling you, that girl is a digital rock star!) You might even leave me a comment; they really do brighten my day! ;o)
Related Posts Plugin for WordPress, Blogger...