Now that I have a phone with a well-functioning camera, (the overly touted Galaxy S4 having been a crushing disappointment) I have been thoroughly enjoying the ability to take actual photos with my phone. My sister-in-law introduced me to the LG V10 (earlier this year when I was searching for a replacement phone) and I absolutely love it! I have to say that it's nice to always have a camera on hand. Although the OIS (optical image stabilization) is not of the same caliber as my still camera (a Canon), it is enough for me to take decent pictures fairly consistently (though no selfies, thank you). Even macro shots (which I love!) have come out pretty darn well (photo below). The Lord has blessed with some amazing photo opportunities over the past week or two, likely because I started asking what He would have me share each time I venture out. Most of the recent photos have been in the garden, since that's where I've been working. Occasionally, when I snap a picture, it takes me a minute to figure out exactly what it is I'm looking at. The other day, however, it took me several. Photo inset: A tiny baby Anole lizard looking up at me from the Chocolate Mint; the leaf he's sitting on is only about an inch long. Isn't he just too cute?
I was outside one afternoon lamenting the recent decimation of my Ageratum, (clearly, Katy had passed along our address) when I spotted a tiny white (?) something on the Garlic Chives. I whipped out my cell, squatted down, and took a picture. I blew it up and looked at it, scratched my head, and looked again. Initially, I thought it had to be the strangest looking bug I'd ever seen. I couldn't quite figure out the coloration and conformation, though it sort of looked like some kind of spider. It appeared to have a pair of "googly eyes" on top of its head, and some sort of green something-or-other sticking out in multiple directions from both sides of its middle. I could even swear I saw a tiny fang, but I couldn't be sure. Imagine my surprise (and delight ;o) when I realized that the green that was sticking out on both sides belonged to none other than Katy - or one of her evil kinfolk (this post). If you click on the photo to blow it up, you can just barely see the edge of the brown stripe; that and those knobby knees are what helped me finally figure out exactly what I was seeing. One evil beastie snack coming right up. At least I'm 99.999% sure that's what it is. After that? Well. Then it was Ah-HA. Ha, HA, HA!! Take that, you greedy heifer! And I saw it with my own eyes, I thought with malicious glee. Not to mention managed to capture it for posterity; what a great day in the garden, eh? ;o) Gosh I sure hope he decides to stay awhile... Ooooh, maybe he'll give his friends our address. Evil beasties beware!
I've recently learned, while thinking about "takeaways" for our visitors (e.g. handouts, fun sheets, our website, this blog, and the Facebook page) that Instagram actually has people over the age of 15 that post real photos. While I don't mind things like family photos, a well-taken shot of a delectable dinner, a decorative dessert, or a cute pic of a couple (G-rated anyway), I find the perpetual "selfies" to be annoying and utterly ridiculous. I get the profile picture thing, I even understand that you might want to change it once in awhile, maybe you got a new haircut or neat glasses. I can even see taking one or two while trying on hats for fun and the like. What I just don't get, are all those [attempted] sultry moues. Really people? The new term is "duck lips" (and ew). I put it in the search bar awhile ago. I was curious to see just how rampant it really was: would you believe there are 810,976 photos with that hashtag?!? That's only those that were spelled correctly; there were 7,000+ more who forgot to add the "s", not to mention all the other variations on the theme. I did find a photo or two with actual ducks, but most were more foul than fowl (and ACK my eyes! ;o) I know for a fact I would look like an idiot, and I have exactly zero interest in verifying that with a camera; not to mention plastering it on a digital billboard that would probably haunt me for all eternity. For every person that can actually pull that sexy pout off (e.g. Marilyn Monroe), there are countless attempts plastered all over social media that leave people looking like they either got their lips caught in a shop vac hose, smashed in the mammogram machine (because they were way shorter than the tech realized), or maybe had some sort of freak botox accident. Not trying to be ugly here, and I certainly hope I didn't offend anyone, but I just don't get the selfie craze. Do you?
Okay, okay that's enough. End quasi-rant and apologies all around. *wince* The point (which I totally missed by having that soapbox moment) is that I am now posting fairly regularly on Instagram and have gotten some really neat photos (in addition to the two posted above) that I want to share. I planted some Rue (in the bed from this post) to attract butterflies, and boy-oh-boy did it work! At last count, there were six - insert excited SQUEE here - Black Swallowtail caterpillars eating their way around in the Rue. I'm hoping I can keep taking photos as they develop; only one has matured to the last instar so far (photo inset - taken with my fabulous phone). I'm also hoping the Rue holds out, since it's still a pretty young plant. Isn't he just too cool? The caterpillars are all in various stages of development. I even found a couple of tiny eggs underneath the leaves; though they've hatched. So awesome. I can hardly wait; I sure do hope we get to see the butterflies! If you'd like to see more of the cell phone photos, you can either look for Epic Farms on Instagram (it's epic_farms), click on the "view on Instagram" button (right-hand side of this blog; click here for email friends), or, if you've "liked" us on Facebook I've added the Instagram feed there (just don't ask me how ;o)
I have quite a few more photos (from the regular camera) I'd like to share too, if time allows. I have an awful lot left to do, and precious little time left in which to do it. There are now less than two weeks until the start of a new school year: Let the countdown begin. Oh, I'm sooo not ready yet. *sniffle* Have a blessed week, and (as always) thank you so much for reading this far!
Slider_JavaScript
Showing posts with label gardening. Show all posts
Katy gets her comeuppance and commencing countdown
Saturday, July 16, 2016
Saturday, July 9, 2016
Pinterest is a VERY dangerous place. It's one of those sites that's like a ginormous black hole in cyberspace. First comes the infatuation, then the gravitation; and once you hit that gravitational pull? Ha. WOOSH! It sucks you right in and the next thing you know it's five hours later. Nothing on your list has gotten done, but hey! you've now discovered 500 new and wondrous things to add to a brand new board full of "schtuff" you totally have to do. In your spare time. Of which you have none. Right then. Idiot. *facepalm* On top of that, you're now horribly late for something you completely forgot about and (to make things more interesting) your derriere has fallen fast asleep in the chair. Sometimes I think I need professional help. Do you do stuff like that? To top it off, Pinterest has now started sending me "ideas I might like". To date, that has generated a short squeal of fear and and immediate deletion of the notification (but it's rapidly becoming a growing challenge not to at least take a peek). Although I've managed to accomplish a handful of things I've seen indoors and out; like the repurposed wheelbarrow (here), and the jazzing up of my light switches (here), there are - literally - hundreds more and me with medium-rare motivation (though I do have my moments ;o)
On the one hand, I have come up with some really neat ideas that were inspired by things I came across on Pinterest. On the other? Well, I have figured out I definitely need to sprout way more hands than two if I want to achieve even a microscopic portion of all the things I've gleefully pinned. One of the pins (site here) I came across that I really, really, liked was using recycled water bottles to create a root watering system for plants. They also introduced me to the "plant nanny" which I'll explain further down. Since we all know Jen can't leave anything alone, I had to put my own creative spin on it. I don't drink bottled water anymore but I do drink juice, so I started saving the big bottles. DH enjoys a glass of wine in the evenings, so I started saving those bottles too. You know, in case I came across something else that they would come in handy for (and is it any wonder my house is terminally cluttered?) Turns out I did find a great use for them. Several, actually. Mmmph.
For the juice bottles, I poked two tiny holes on the plant side at the very bottom and buried them a short distance from the plant. I filled them with water, and went on my merry way. Checking the water levels every day got annoying in very short order (I couldn't tell where the line was, so I had to open each one to check). Tedious and time-consuming. Grr. Nope, not happening. As much as I hated the neon orange, it was easily solved with some inexpensive fishing bobbers. Now I can see where the water line is from just about anywhere I stand. I also didn't like the yellow caps on the bottles. Since they don't need to be tight, I opted to swap them out for some plain white ones from empty supplement bottles (thankfully, that idea hit just as I was about to throw several empties in the trash). Since we have a more rustic theme in the back, I went with black caps back there. Then I spent some time wondering how I could jazz up the tops a bit more. I didn't like all of that "sameness". I mean, it's not like I could just LEAVE IT ALONE, right? Yeesh. Painting was too much trouble, and any embellishment glued on there would probably just fall off. Then I thought about all those spectacular cabinet knobs at Hobby Lobby. You know, the ones they regularly put on sale for half price? Not only would they add something unique to my gardens, it would make it easier to handle the tops. WOO! Now we're talking!
I had a field day picking up decorative knobs over the past few months - I tried to stick with porcelain and other things I thought would (I hope) survive outside. Here's what they look like:
Although the juice bottle idea worked like a charm in the supersized planters and flowerbeds, I still had a number of smaller planters scattered everywhere. As much as I love my plants, it will be tough to keep up with it all once reality sets back in (back to school) at the end of the month. Enter the nifty little invention I mentioned earlier: the "plant nanny". It's a terra cotta spike that will hold large bottles in an inverted position; since terra cotta is porous, it allows the water to seep slowly into the roots. An automated potted plant watering system? Boo-Yeah. Now we're talking! (See? I knew I should totally save all those wine bottles ;o) If you click on the picture to blow it up, you can just see the top of the spike in the soil. The downside (of course there had to be one) is that they are hideously expensive at around $20 for a box of four. *gulp* I found one that was a little less; I think it was called the "plant minder" or something like that anyway.
I still had the other half of DD's crib; the first end being ensconced by the front beds (here) and its springs adorning the wall outside the feed room (here). I decided the shape of the crib end might make a neat little backbone piece for a potting area of sorts. After searching until my eyeballs bled, I opted to "go it alone" and make some kind of a small stand to use on the patio. I painted the crib end a nice rustic red and just stared at it for awhile. Walked around it. I'm pretty sure I burned up quite a few brain cells pondering and percolating, as I eyeballed it from all angles. In order to keep things complicated, I also tried to make use of multiple leftovers from other P-words (projects). There might have been a day or two where I was absolutely certain that DIY actually stood for, "Delusional Is YOU" and nobody ever told me that's what it really meant. Eventually I got it all figured out right down to the small rolled up piece of leftover chicken wire I kept moving around to get it out of the way (you know the thing, it's too small to use for anything, but too big to throw away?). Hobby Lobby put their Spring Shop items on sale at 66% off, and I made a beeline for some fabulous art deco brackets (photo) that I had been drooling over (they wound up being $5.44 each - WHOOP! :o) I also found a decorative piece with multiple hooks for half price to hang my tools and gloves. I chose to hang it improperly, of course, with part of it sticking up above the top of the crib end. It gave it a nice finished look - at least I thought it did.
It was really hard to get a clear picture with the patio all shady and so much light behind it. Even though it was raining, the light was too much and I wound up taking flash pictures which made the color look a little funky. The photo below is a bit better. Overall, I was delighted with the way it turned out, although I may need to go back and paint those bottom pieces...
I bolted it to the post behind it for stability, since it only has two legs. It's pretty unobtrusive, which I like (I'll have a real potting bench in the garage eventually - It's on The List. *eyeroll*). I just needed a small space to store gardening things and somewhere to pot up any cuttings I might have to share with our visitors. The chicken wire (though annoying) added a bit of rustic flair. It also meant that I got rid of something else that was laying around - Hooray!!
Even though I had to add a scrap piece of 2x4 behind it to make it work (the leftover shelf piece was too narrow for the brackets) I decided the raised shelf in the back worked great for smaller garden related items. Things like an old spice jar full of eggshells for new plantings, plant tags to label shared cuttings (held in one of DD's wood practice pieces from college), and a little pot with all the informational thingies from my plants and flowers, among other things.
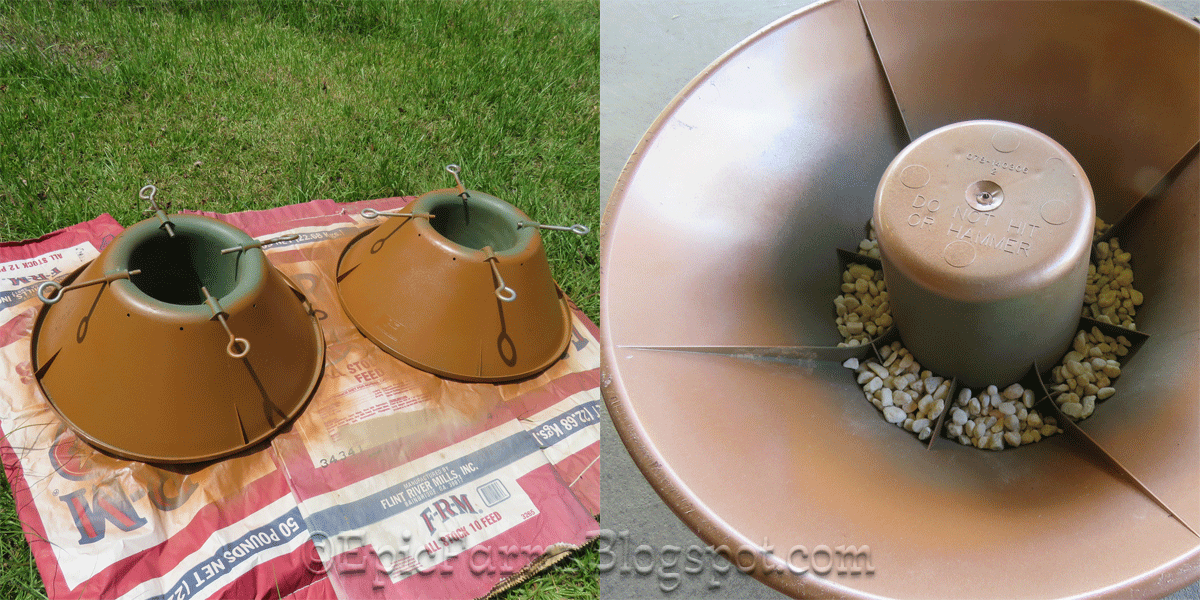
Next to the potting stand, one of my favorite MSU's (make somethin' up ;o) so far this year has to be the butterfly bath planters. I had two old Christmas tree stands sitting in the garage. I think I spent about two months just looking at them. I knew I could use them "as is" for planters, but I didn't really like it that way. They took up too much room for one thing (too clunky) and, well, I just didn't like it. At some point, I flipped them over and stared a bit more before the AHA moment hit (don't you love those?) I could plant multiple plants in it if I turned it upside down. A handy bonus? The extra large eye bolts used to stabilize the tree in the stand would offer some additional stability in its inverted position. Initially, I thought to put a flowerpot on the center "shelf" creating a tiered look, but then inspiration struck again and I decided to use a flowerpot saucer to make a butterfly and bee bath instead. To paraphrase what's-his-face from the A-Team, "I love it when a plan[ter] comes together". Bwahahaha. *snort* Yeah, I know, I'm corny and my age is showing :oP
I drilled some holes for drainage, got out my trusty spray paint and went to town (again, with the less expensive base coat followed by the outdoor metallic paint). Some sparkly paint and stepping stones for the bees and the butterflies coming right up!
Since bees and butterflies can drown (and garden lifeguards are in short supply), some pretty pieces of hexagonal glass from Hobby Lobby made the perfect stepping stone. My friendly neighborhood feed store (Ace is the place ;o) was nice enough to put some $2 flats of Gaillardia right by the door where I'd trip over them on my feed run and.... Viola! Do you like it?
It will look better, I'm sure, when the flowers "fill in" a little bit more. SO...I'm pretty sure that's more than enough for now. I'm all talked out, and I'll just bet you're tired of reading (or you fudged it and mostly just looked at the pictures ;o) If you're a picture person, feel free to look us up on Instagram (there's a shot of our very first visitor to the butterfly bath on there). Have a wonderful weekend and a beautifully blessed week!
On the one hand, I have come up with some really neat ideas that were inspired by things I came across on Pinterest. On the other? Well, I have figured out I definitely need to sprout way more hands than two if I want to achieve even a microscopic portion of all the things I've gleefully pinned. One of the pins (site here) I came across that I really, really, liked was using recycled water bottles to create a root watering system for plants. They also introduced me to the "plant nanny" which I'll explain further down. Since we all know Jen can't leave anything alone, I had to put my own creative spin on it. I don't drink bottled water anymore but I do drink juice, so I started saving the big bottles. DH enjoys a glass of wine in the evenings, so I started saving those bottles too. You know, in case I came across something else that they would come in handy for (and is it any wonder my house is terminally cluttered?) Turns out I did find a great use for them. Several, actually. Mmmph.
For the juice bottles, I poked two tiny holes on the plant side at the very bottom and buried them a short distance from the plant. I filled them with water, and went on my merry way. Checking the water levels every day got annoying in very short order (I couldn't tell where the line was, so I had to open each one to check). Tedious and time-consuming. Grr. Nope, not happening. As much as I hated the neon orange, it was easily solved with some inexpensive fishing bobbers. Now I can see where the water line is from just about anywhere I stand. I also didn't like the yellow caps on the bottles. Since they don't need to be tight, I opted to swap them out for some plain white ones from empty supplement bottles (thankfully, that idea hit just as I was about to throw several empties in the trash). Since we have a more rustic theme in the back, I went with black caps back there. Then I spent some time wondering how I could jazz up the tops a bit more. I didn't like all of that "sameness". I mean, it's not like I could just LEAVE IT ALONE, right? Yeesh. Painting was too much trouble, and any embellishment glued on there would probably just fall off. Then I thought about all those spectacular cabinet knobs at Hobby Lobby. You know, the ones they regularly put on sale for half price? Not only would they add something unique to my gardens, it would make it easier to handle the tops. WOO! Now we're talking!I had a field day picking up decorative knobs over the past few months - I tried to stick with porcelain and other things I thought would (I hope) survive outside. Here's what they look like:
Although the juice bottle idea worked like a charm in the supersized planters and flowerbeds, I still had a number of smaller planters scattered everywhere. As much as I love my plants, it will be tough to keep up with it all once reality sets back in (back to school) at the end of the month. Enter the nifty little invention I mentioned earlier: the "plant nanny". It's a terra cotta spike that will hold large bottles in an inverted position; since terra cotta is porous, it allows the water to seep slowly into the roots. An automated potted plant watering system? Boo-Yeah. Now we're talking! (See? I knew I should totally save all those wine bottles ;o) If you click on the picture to blow it up, you can just see the top of the spike in the soil. The downside (of course there had to be one) is that they are hideously expensive at around $20 for a box of four. *gulp* I found one that was a little less; I think it was called the "plant minder" or something like that anyway.
I still had the other half of DD's crib; the first end being ensconced by the front beds (here) and its springs adorning the wall outside the feed room (here). I decided the shape of the crib end might make a neat little backbone piece for a potting area of sorts. After searching until my eyeballs bled, I opted to "go it alone" and make some kind of a small stand to use on the patio. I painted the crib end a nice rustic red and just stared at it for awhile. Walked around it. I'm pretty sure I burned up quite a few brain cells pondering and percolating, as I eyeballed it from all angles. In order to keep things complicated, I also tried to make use of multiple leftovers from other P-words (projects). There might have been a day or two where I was absolutely certain that DIY actually stood for, "Delusional Is YOU" and nobody ever told me that's what it really meant. Eventually I got it all figured out right down to the small rolled up piece of leftover chicken wire I kept moving around to get it out of the way (you know the thing, it's too small to use for anything, but too big to throw away?). Hobby Lobby put their Spring Shop items on sale at 66% off, and I made a beeline for some fabulous art deco brackets (photo) that I had been drooling over (they wound up being $5.44 each - WHOOP! :o) I also found a decorative piece with multiple hooks for half price to hang my tools and gloves. I chose to hang it improperly, of course, with part of it sticking up above the top of the crib end. It gave it a nice finished look - at least I thought it did.
It was really hard to get a clear picture with the patio all shady and so much light behind it. Even though it was raining, the light was too much and I wound up taking flash pictures which made the color look a little funky. The photo below is a bit better. Overall, I was delighted with the way it turned out, although I may need to go back and paint those bottom pieces...
I bolted it to the post behind it for stability, since it only has two legs. It's pretty unobtrusive, which I like (I'll have a real potting bench in the garage eventually - It's on The List. *eyeroll*). I just needed a small space to store gardening things and somewhere to pot up any cuttings I might have to share with our visitors. The chicken wire (though annoying) added a bit of rustic flair. It also meant that I got rid of something else that was laying around - Hooray!!
Even though I had to add a scrap piece of 2x4 behind it to make it work (the leftover shelf piece was too narrow for the brackets) I decided the raised shelf in the back worked great for smaller garden related items. Things like an old spice jar full of eggshells for new plantings, plant tags to label shared cuttings (held in one of DD's wood practice pieces from college), and a little pot with all the informational thingies from my plants and flowers, among other things.
Next to the potting stand, one of my favorite MSU's (make somethin' up ;o) so far this year has to be the butterfly bath planters. I had two old Christmas tree stands sitting in the garage. I think I spent about two months just looking at them. I knew I could use them "as is" for planters, but I didn't really like it that way. They took up too much room for one thing (too clunky) and, well, I just didn't like it. At some point, I flipped them over and stared a bit more before the AHA moment hit (don't you love those?) I could plant multiple plants in it if I turned it upside down. A handy bonus? The extra large eye bolts used to stabilize the tree in the stand would offer some additional stability in its inverted position. Initially, I thought to put a flowerpot on the center "shelf" creating a tiered look, but then inspiration struck again and I decided to use a flowerpot saucer to make a butterfly and bee bath instead. To paraphrase what's-his-face from the A-Team, "I love it when a plan[ter] comes together". Bwahahaha. *snort* Yeah, I know, I'm corny and my age is showing :oP
I drilled some holes for drainage, got out my trusty spray paint and went to town (again, with the less expensive base coat followed by the outdoor metallic paint). Some sparkly paint and stepping stones for the bees and the butterflies coming right up!
Since bees and butterflies can drown (and garden lifeguards are in short supply), some pretty pieces of hexagonal glass from Hobby Lobby made the perfect stepping stone. My friendly neighborhood feed store (Ace is the place ;o) was nice enough to put some $2 flats of Gaillardia right by the door where I'd trip over them on my feed run and.... Viola! Do you like it?
It will look better, I'm sure, when the flowers "fill in" a little bit more. SO...I'm pretty sure that's more than enough for now. I'm all talked out, and I'll just bet you're tired of reading (or you fudged it and mostly just looked at the pictures ;o) If you're a picture person, feel free to look us up on Instagram (there's a shot of our very first visitor to the butterfly bath on there). Have a wonderful weekend and a beautifully blessed week!
Thy cookie? It hath crumbleth.
Saturday, June 18, 2016
I haven't thought about that phrase [That's how the cookie crumbles] in a really long time. Now that I do, I realize that you don't hear anybody use it anymore. At least I don't, do you? Not sure why really; I guess it just fizzled out. Sometimes I just get so darn discouraged when umpteen things go wrong at once. Tired. I have to remind myself that this life is supposed to be kind of... Well, Crummy (ha). If it wasn't, we wouldn't go looking for the Lord. At least I know I sure wouldn't have - are you kidding? I've got stubborn independence (to the power of stupid) goin' on up in here ;o) Some days I have to continuously remind myself that in Heaven there are no grouchy, mean, rude, obnoxious or sneaky people, no health problems, no junk mail, no eyeball-crossing kidney stones (thank you chemo), no spam, no leaky roofs (yep, we found it), no fire ants, no weeds, and NO icky invisible spider webs suspended at face level smack in the middle of your path (ACK!). I'll toss in the hailstorm we had last night (which was really scary). Thankfully, we all came through unscathed.
If you've never read (or listened to) Randy Alcorn's Heaven, (here) I highly recommend it. So very, very encouraging! We had a church bible study that I couldn't make, but my friend Lori loaned me her set of CDs to listen to in the car. It was so good I turned around and bought the set for my parents at Christmas. Actually, it's on my list of thing to get for myself as well (I'm pretty sure I need to listen to it at least once a month; maybe more ;o)
Photo: One of the Mini-Mums in the feed room flowerbed (I erased the background in Photoshop).
You know what I wish? I wish would learn not to say things out loud (this post). One day? One day I will actually learn this. Clearly, using the phrase "before it gets too hot" in a recent post was an egregious error on my part. I don't think we've broken any records for high temperatures thus far, but we've gotten pretty darn close around here. It's been absolutely awful outside (blech). Is it hot at your house? Now 88° is not a big deal around here, but it's usually straight up temps at the beginning of June. What caught me off guard was the "Real Feel" 104° heat index off to the right there (and small wonder I was sweating soprofusely, er, delicately. Oh, I get it - and raspberries to that. Meh. :oP Part of the difficulty stems from the rapid temperature jumps. I would much rather sneak up slowly on my seasons thank you very much (wouldn't you?) I've almost finished with the flowerbeds (hooray!), and although I have a bit left to do I thought you might like a progress report.
I had some close supervision by a Mourning Dove going on while I worked on the back beds. I got a kick out of the "Are you sure you know what you're doing?" look (apparently there was concern I might mess it up ;o) I love what the morning sun and dew did to the grass in the background.
The Sweet Potato Vine is (obviously) quite happy and fabulously trailing away:
The Nasturtium that I started from seed (and was oh-so-happy over in this post) was decimated in short order by a horde of hungry cabbage moth caterpillars (aka Wretched Evil Beasties). They also almost killed off my lunchbox Alyssum (though it's on the mend, I think). I found some yellow Portulaca on the clearance cart at Lowe's for .50¢ each - and whoop! ;o) so we've started all over again in the wheelbarrow. Happily the Gerbra Daisy is doing well:
Had some additional trouble with another evil beastie in the front bed; a totally different kind of caterpillar that burrowed in the dirt at the base of the Coneflower. Look at the difference between the two plants. He'd almost polished the poor plant on the left completely off before I finally saw him and took him out (AHA! Gotcha, you little cretin! Mwa-ha-ha-ha ;o) In case anyone else needs to know, I found an organic 3-in-1 spray (this stuff) that should prevent future invasions/infestations. Hope springs eternal!
I've been blown away by the sheer volume of plants I've found on clearance carts (in a really, really good way ;o) The bulk of my plants have ranged from .17¢ to a whopping $3.00 with the majority costing $1.00. Exciting stuff when you're on a no-budget budget. *laugh* I ordered a few plants online, which I've never done before. Shipping is rather expensive, so the school nurse and I went in "halvsies" on an order from the Grower's Exchange (here) right before the end of school. I ordered a few more from Bluestone Perennials (here), and I have to say their plants arrived in much better condition (they also offered a much bigger selection). I will definitely order from them again if I can swing it.
The bird bath was given to us by an elderly neighbor who is moving away (and downsizing). This is the bed I'm going to call the "Recycling Plant" (haha). It's mostly done, though I do need to fill one more planter and finish the lugging of the lumber. Right now it only has a back side. The container painting was a pain, but I liked the monochromatic shades of brown on the [garbage] cans and [yard] carts; they provide a nice muted backdrop for the plants. I mixed in some terra cotta pots (because they're the cheapest), and even painted two wastebaskets (which were even cheaper) the same shade. I can hardly wait for everything to fill in. *squeeee* I'll have some additional interesting details for you next week (at least I think I will!)
I was tickled to find Cedric the Toad looking quite content in his new digs by the African Iris. I painted it years (and years) ago, and moved it from the front bed yesterday just for him. For those of you who do not follow us on Instagram (here), I found Sir Cedric lounging about in the tea kettle with my Purslane earlier this week; he had a definite air of superiority about him. I figured his interest in tea time must make him an import from "across the pond". Since I decided to bestow him with a "title", *snicker* I thought we'd just go the whole nine yards with it. Can you see him tucked away in there? I tried to get a closeup for you, but it was rather awkward:
If I had my druthers, (and for those of you scratching your heads, click here) I'd really prefer to get everything from local nurseries. It's a lot easier to get help for one thing, they actually know things about gardening in general, plus they are a lot more up front about native plants. More expensive, though. Lowe's has a nasty habit of selling really pretty things that don't grow here. WalMart does it, too. I found this cool two-toned Ixora on the clearance cart last time; but it isn't a perennial for our zone (a fact I forgot to double check before I snatched it up since it didn't have the informational tag on it and I was in a hurry - big V-8 to the forehead smack for Jen - Grr). Since it was another clearance special, I won't cry if it dies though I will be quite disappointed ('cause it's neat ;o)
I'll leave you with a couple of shots of Herman the Hedgehog. He was one of those boot cleaner thingies, but all of his "prickles" fell off due to old age. I took him apart and decided to give him a coat of paint and a new lease on life as a plant stand. Herman is sporting some "Spicy Globe Basil" in a sparkly painted pot. I loved the vivid green leaves, and the mounding habit of the basil should be a fun look for him when it fills out. It's an annual though, so Herman will need a new wardrobe again next year.
Thank you for reading this far; because this post got really long! *wince* Have a wonderful weekend and a beautifully blessed week!
If you've never read (or listened to) Randy Alcorn's Heaven, (here) I highly recommend it. So very, very encouraging! We had a church bible study that I couldn't make, but my friend Lori loaned me her set of CDs to listen to in the car. It was so good I turned around and bought the set for my parents at Christmas. Actually, it's on my list of thing to get for myself as well (I'm pretty sure I need to listen to it at least once a month; maybe more ;o)
Photo: One of the Mini-Mums in the feed room flowerbed (I erased the background in Photoshop).
You know what I wish? I wish would learn not to say things out loud (this post). One day? One day I will actually learn this. Clearly, using the phrase "before it gets too hot" in a recent post was an egregious error on my part. I don't think we've broken any records for high temperatures thus far, but we've gotten pretty darn close around here. It's been absolutely awful outside (blech). Is it hot at your house? Now 88° is not a big deal around here, but it's usually straight up temps at the beginning of June. What caught me off guard was the "Real Feel" 104° heat index off to the right there (and small wonder I was sweating so
I had some close supervision by a Mourning Dove going on while I worked on the back beds. I got a kick out of the "Are you sure you know what you're doing?" look (apparently there was concern I might mess it up ;o) I love what the morning sun and dew did to the grass in the background.
The Sweet Potato Vine is (obviously) quite happy and fabulously trailing away:
The Nasturtium that I started from seed (and was oh-so-happy over in this post) was decimated in short order by a horde of hungry cabbage moth caterpillars (aka Wretched Evil Beasties). They also almost killed off my lunchbox Alyssum (though it's on the mend, I think). I found some yellow Portulaca on the clearance cart at Lowe's for .50¢ each - and whoop! ;o) so we've started all over again in the wheelbarrow. Happily the Gerbra Daisy is doing well:
Had some additional trouble with another evil beastie in the front bed; a totally different kind of caterpillar that burrowed in the dirt at the base of the Coneflower. Look at the difference between the two plants. He'd almost polished the poor plant on the left completely off before I finally saw him and took him out (AHA! Gotcha, you little cretin! Mwa-ha-ha-ha ;o) In case anyone else needs to know, I found an organic 3-in-1 spray (this stuff) that should prevent future invasions/infestations. Hope springs eternal!
I've been blown away by the sheer volume of plants I've found on clearance carts (in a really, really good way ;o) The bulk of my plants have ranged from .17¢ to a whopping $3.00 with the majority costing $1.00. Exciting stuff when you're on a no-budget budget. *laugh* I ordered a few plants online, which I've never done before. Shipping is rather expensive, so the school nurse and I went in "halvsies" on an order from the Grower's Exchange (here) right before the end of school. I ordered a few more from Bluestone Perennials (here), and I have to say their plants arrived in much better condition (they also offered a much bigger selection). I will definitely order from them again if I can swing it.
The bird bath was given to us by an elderly neighbor who is moving away (and downsizing). This is the bed I'm going to call the "Recycling Plant" (haha). It's mostly done, though I do need to fill one more planter and finish the lugging of the lumber. Right now it only has a back side. The container painting was a pain, but I liked the monochromatic shades of brown on the [garbage] cans and [yard] carts; they provide a nice muted backdrop for the plants. I mixed in some terra cotta pots (because they're the cheapest), and even painted two wastebaskets (which were even cheaper) the same shade. I can hardly wait for everything to fill in. *squeeee* I'll have some additional interesting details for you next week (at least I think I will!)
I was tickled to find Cedric the Toad looking quite content in his new digs by the African Iris. I painted it years (and years) ago, and moved it from the front bed yesterday just for him. For those of you who do not follow us on Instagram (here), I found Sir Cedric lounging about in the tea kettle with my Purslane earlier this week; he had a definite air of superiority about him. I figured his interest in tea time must make him an import from "across the pond". Since I decided to bestow him with a "title", *snicker* I thought we'd just go the whole nine yards with it. Can you see him tucked away in there? I tried to get a closeup for you, but it was rather awkward:
If I had my druthers, (and for those of you scratching your heads, click here) I'd really prefer to get everything from local nurseries. It's a lot easier to get help for one thing, they actually know things about gardening in general, plus they are a lot more up front about native plants. More expensive, though. Lowe's has a nasty habit of selling really pretty things that don't grow here. WalMart does it, too. I found this cool two-toned Ixora on the clearance cart last time; but it isn't a perennial for our zone (a fact I forgot to double check before I snatched it up since it didn't have the informational tag on it and I was in a hurry - big V-8 to the forehead smack for Jen - Grr). Since it was another clearance special, I won't cry if it dies though I will be quite disappointed ('cause it's neat ;o)
I'll leave you with a couple of shots of Herman the Hedgehog. He was one of those boot cleaner thingies, but all of his "prickles" fell off due to old age. I took him apart and decided to give him a coat of paint and a new lease on life as a plant stand. Herman is sporting some "Spicy Globe Basil" in a sparkly painted pot. I loved the vivid green leaves, and the mounding habit of the basil should be a fun look for him when it fills out. It's an annual though, so Herman will need a new wardrobe again next year.
Thank you for reading this far; because this post got really long! *wince* Have a wonderful weekend and a beautifully blessed week!
Fun? There was fun?
Monday, May 30, 2016
Well there must have been quite a bit of it somewhere out there, because I don't mind telling you this month has FLOWN. How can it be that school is over already? Not that I'm complaining, mind you. Nope, nary a bit. For some reason, though, the end of school seems to have snuck up on us superquick. Can it really be almost June? I'm toiling away in the yard at home (yes, still). I'm trying to hurry and finish everything I want to do before it gets too darn hot to be out there. We've hit 90 for the first time already this year, which is alarmingly quick for this area (hoping it's not an unhappy harbinger :o\ Have to tell you though, that one of the neatest little things I've come across in the garden center this year is succulents. I have had this old blue soup ladle (photo inset) for EVER. As in, I have no idea where (or who) it even came from. Nana, maybe? Not a clue. I'm pretty sure the ladle has been housed in every single drawer in my kitchen over the years in an effort to "get it out of the way". Ridiculous, I know, but I just couldn't bring myself to get rid of it because (for some strange reason) I absolutely love it. Do you ever do that? Anyhoo... to make a short story long, I found this itty bitty succulent to put in it (yes, it's real) and hung it on the wall by my kitchen window. He seems to be quite happy there. Since I smile every time I see it, I'm happy too. Guess we have a win-win then, don't we ;o)
I didn't have enough time last week between work and home (where there was more work waiting *laugh*) to finish this post, so I'm going with pictures and a pitiful parody of a poem (three cheers for random alliterations). I've taken a few progress pictures in the garden to share with you this week. Now that school's out, I hope to be able to post a bit more regularly; not to mention catch up on my blog reading. I've really struggled with making it all work (and vis-a-vis my sporadic posting so far, it clearly didn't ;oP
Photo Inset: A closeup of a Coreopsis flower. They're smaller than a quarter, but they are beautiful blooms. Doesn't it look like the colors were airbrushed? Actually since it's God's artistry, I guess they were at that.
SO...
I took the pictures below,
that you might know;
How does the garden grow?
Merrily, verily, and somewhat contrarily.
BUT...
It's taking forever,
though the fifth of never,
Could be here before I know.
*facepalm*
Whoooo's punchy? (see me sheepishly raising my hand). Um, yeah. *AHEM* Sooo anyway.... Don't quit your day job, Jennifer. Right. Let's just move along to the photos, shall we?
Remember the Alyssum in DH's old lunchbox? It has filled in nicely (though I didn't take this shot at the best time; the blooms are fading). Happily, this plant blooms continuously. It was one of those bargain basement specials. Not bad for a buck, eh?
I did, however, get a decent closeup of the blooms for you before they started to fade:
The Lemon Thyme seems to be quite happy in its new space. I like the shade variance in the leaves, which are incredibly tiny. Smells good too!
I came across this little pretty in a clearance cart for $1; it's perfect for the hanging basket. It's called a Superbell, and this particular variety is "Apricot Punch". I have to say, though, it's a rather slow grower, but I really like the colors over the [recycled] wheelbarrow planter.
For those of you who prefer something a little closer to instant gratification in your garden, the mints grow fairly quickly. They are, however, also quite invasive which is why I put all of the mint I planted in pots. This one is Chocolate Mint, which smells divine. Rub a leaf and think Peppermint Patties and mint chocolate chip ice cream ;o) Yummy. The photo on the left is a better shot of how it really looks (though the leaves are wet). It has rich green leaves and "chocolate" stems.
I think my favorite "quickie" has to the the Sweet Potato Vine. It grows rapidly; as in several inches a day. It's perfect for the spill in a pot (as in: the "fill and spill" rule for planting in pots). There is a bright green variety (like mine) and there is also a burgundy variety which is spectacular. This one was another $1 rescue (pronounced onedollah *laugh*) my favorite kind of plant!
As always, thank you for reading this far! Stay safe, pray for our military past and present and their families, and have a very blessed Memorial Day ;o)
I didn't have enough time last week between work and home (where there was more work waiting *laugh*) to finish this post, so I'm going with pictures and a pitiful parody of a poem (three cheers for random alliterations). I've taken a few progress pictures in the garden to share with you this week. Now that school's out, I hope to be able to post a bit more regularly; not to mention catch up on my blog reading. I've really struggled with making it all work (and vis-a-vis my sporadic posting so far, it clearly didn't ;oP
Photo Inset: A closeup of a Coreopsis flower. They're smaller than a quarter, but they are beautiful blooms. Doesn't it look like the colors were airbrushed? Actually since it's God's artistry, I guess they were at that.
SO...
I took the pictures below,
that you might know;
How does the garden grow?
Merrily, verily, and somewhat contrarily.
BUT...
It's taking forever,
though the fifth of never,
Could be here before I know.
*facepalm*
Whoooo's punchy? (see me sheepishly raising my hand). Um, yeah. *AHEM* Sooo anyway.... Don't quit your day job, Jennifer. Right. Let's just move along to the photos, shall we?
Remember the Alyssum in DH's old lunchbox? It has filled in nicely (though I didn't take this shot at the best time; the blooms are fading). Happily, this plant blooms continuously. It was one of those bargain basement specials. Not bad for a buck, eh?
I did, however, get a decent closeup of the blooms for you before they started to fade:
The Lemon Thyme seems to be quite happy in its new space. I like the shade variance in the leaves, which are incredibly tiny. Smells good too!
I came across this little pretty in a clearance cart for $1; it's perfect for the hanging basket. It's called a Superbell, and this particular variety is "Apricot Punch". I have to say, though, it's a rather slow grower, but I really like the colors over the [recycled] wheelbarrow planter.
For those of you who prefer something a little closer to instant gratification in your garden, the mints grow fairly quickly. They are, however, also quite invasive which is why I put all of the mint I planted in pots. This one is Chocolate Mint, which smells divine. Rub a leaf and think Peppermint Patties and mint chocolate chip ice cream ;o) Yummy. The photo on the left is a better shot of how it really looks (though the leaves are wet). It has rich green leaves and "chocolate" stems.
I think my favorite "quickie" has to the the Sweet Potato Vine. It grows rapidly; as in several inches a day. It's perfect for the spill in a pot (as in: the "fill and spill" rule for planting in pots). There is a bright green variety (like mine) and there is also a burgundy variety which is spectacular. This one was another $1 rescue (pronounced onedollah *laugh*) my favorite kind of plant!
As always, thank you for reading this far! Stay safe, pray for our military past and present and their families, and have a very blessed Memorial Day ;o)
...and a Moanin' and a Groanin'
Saturday, May 14, 2016
In the last post, A Weedin' and a Seedin', I talked about my exciting spurt of industriousness over the past few weeks outside in the yard. More specifically, in the flowerbeds okay, okay, more like weedbeds, around the house. Unfortunately, once you get to a certain *ahem* point in your life, overly enthusiastic productivity tends to come at a price. Well, I paid for my little weed-fest with some horrible stiffness followed by some pretty intense pain in not one, but both arms/elbows (because if you're going to mess yourself up, you should take care to do it fairly and evenly *snarl*). Since the pain was followed by increasing swelling in my upper arms (as in edema; the kind that didn't go away), I paid again for the doctor to diagnose me with acute tendinitis. Not that I thought it was cute. At all. So, I suppose that would make it more like twice the price, eh? The doctor gave me some anti-inflammatories to help with the swelling (so why don't we make that thrice the price), and tossed in a shot to jump start the process (oh, goody). I have, of course, now slowed down to the speed of sloth. That was on Friday. On Saturday, I woke up with a nasty chest cold (just because I could). Clearly, not my best week (of course it wasn't my worst, either! *grin*). I spent the next couple of days hoping I wouldn't cough up a lung (though it wasn't for lack of trying) ;oP
Photo Inset: The Dusty Miller I planted in front of the recycled garden cart (even with newspaper and/or feed bags under the mulch - which I ran out of - some grass still snuck through. ARGH!
Down, but not out. Ha. Anyhoo, back to some productivity (albeit at a much more mundane pace). One of the coolest things I learned recently was about bananas. I'd already read about planting a banana peel in the garden, but we have fire ants here. Hateful, nasty little things that multiply worse than guppies and you can just bet said bananas I am NOT going to feed those evil little beasties. Ever. BUT - somewhere on Pinterest, I found a handy fertilizer hack. Idiot-friendly, easy-peasy and all (my most favorite kind!). Eat a banana (or two), then take the peels and stick them in a mason jar. Cover with water, and let it sit for up to a week. Not only do you wind up with some nifty (not to mention thrifty!) fertilizer for your plants, you also have an uber cool science-experiment-looking concoction sitting on your shelf. Your plants will totally appreciate the potassium kick; mine sure do! I added a pinch of eggshells to mine (rinse them out first), for a calcium boost.
Photo inset: Fertilizer in the making (Dr. Frank-un-schteen, I presume. Hee ;o)
Here's another awesome idea I came across: Take some clean plastic bottles (I used juice) and poke a pinhole or two on the side at the very bottom, then bury it by your plants for underground irrigation. You can even use the cap to help regulate the flow; e.g. the tighter you make the cap, the slower the flow. I left mine loose, since these are new plants. I also added my own twist to it: I bought some el-cheapo fishing bobbers which enabled me to check the water levels from a distance. Looks like everybody but one needs a refill. See the bright orange bobber on the bottom right? Gotta love that lazy gal gardening! As soon as Hobby Lobby puts their drawer pulls back on sale, I think I'm going to get some and put them on top of the bottles. What do you think?
Photo Inset: I'm still working on this bed, but the flowers, in case anyone's interested, are Coreopsis (front and center), Echinacea/Coneflower (behind left/right), and Argeratum (the purple stuff all the way in the back).
Speaking of bottles, (and garden hacks ;o) I also learned that wine bottles work wonders as irrigators in both pots and in the ground. Although I bought one set of "plant nannies" (terra cotta spikes that fit over the bottle), I found the bottles seem to work just as well without them. Just fill, flip, and stick 'em in there. A most welcome revelation, that, since those little terra cotta boogers were quite expensive (for me, anyway). You would think that the water would just run right out, but it doesn't. Pretty cool, eh?
Looks like it'll be daylight soon, and there is plenty of work left for me to do out there. *sigh* Here are a few more pictures for you...
Just look at how the Alyssum has blossomed since that last posted photo! (here)
I planted some Bee Balm and Belleza in front of the Plumbago, which is just now beginning to bloom - though I took too long to get two of them in the ground (they look a little sad right now, but hopefully they'll bounce back soon). I can hardly wait until that Bee Balm starts to flower!
Since the Orange Mint (top of the ladder) looked a little lonely sitting by itself, I moved the Lemon Thyme into the back bed to keep him company. The thyme looks much happier there than it did where I had it on the patio. Sure do wish I had more of those fabulous clay planters though.
Have a hug and blessed week ya'll - and, as always, thanks for reading this far!
Photo Inset: The Dusty Miller I planted in front of the recycled garden cart (even with newspaper and/or feed bags under the mulch - which I ran out of - some grass still snuck through. ARGH!
Down, but not out. Ha. Anyhoo, back to some productivity (albeit at a much more mundane pace). One of the coolest things I learned recently was about bananas. I'd already read about planting a banana peel in the garden, but we have fire ants here. Hateful, nasty little things that multiply worse than guppies and you can just bet said bananas I am NOT going to feed those evil little beasties. Ever. BUT - somewhere on Pinterest, I found a handy fertilizer hack. Idiot-friendly, easy-peasy and all (my most favorite kind!). Eat a banana (or two), then take the peels and stick them in a mason jar. Cover with water, and let it sit for up to a week. Not only do you wind up with some nifty (not to mention thrifty!) fertilizer for your plants, you also have an uber cool science-experiment-looking concoction sitting on your shelf. Your plants will totally appreciate the potassium kick; mine sure do! I added a pinch of eggshells to mine (rinse them out first), for a calcium boost.
Photo inset: Fertilizer in the making (Dr. Frank-un-schteen, I presume. Hee ;o)
Here's another awesome idea I came across: Take some clean plastic bottles (I used juice) and poke a pinhole or two on the side at the very bottom, then bury it by your plants for underground irrigation. You can even use the cap to help regulate the flow; e.g. the tighter you make the cap, the slower the flow. I left mine loose, since these are new plants. I also added my own twist to it: I bought some el-cheapo fishing bobbers which enabled me to check the water levels from a distance. Looks like everybody but one needs a refill. See the bright orange bobber on the bottom right? Gotta love that lazy gal gardening! As soon as Hobby Lobby puts their drawer pulls back on sale, I think I'm going to get some and put them on top of the bottles. What do you think?
Photo Inset: I'm still working on this bed, but the flowers, in case anyone's interested, are Coreopsis (front and center), Echinacea/Coneflower (behind left/right), and Argeratum (the purple stuff all the way in the back).
Speaking of bottles, (and garden hacks ;o) I also learned that wine bottles work wonders as irrigators in both pots and in the ground. Although I bought one set of "plant nannies" (terra cotta spikes that fit over the bottle), I found the bottles seem to work just as well without them. Just fill, flip, and stick 'em in there. A most welcome revelation, that, since those little terra cotta boogers were quite expensive (for me, anyway). You would think that the water would just run right out, but it doesn't. Pretty cool, eh?
Looks like it'll be daylight soon, and there is plenty of work left for me to do out there. *sigh* Here are a few more pictures for you...
Just look at how the Alyssum has blossomed since that last posted photo! (here)
I planted some Bee Balm and Belleza in front of the Plumbago, which is just now beginning to bloom - though I took too long to get two of them in the ground (they look a little sad right now, but hopefully they'll bounce back soon). I can hardly wait until that Bee Balm starts to flower!
Since the Orange Mint (top of the ladder) looked a little lonely sitting by itself, I moved the Lemon Thyme into the back bed to keep him company. The thyme looks much happier there than it did where I had it on the patio. Sure do wish I had more of those fabulous clay planters though.
Have a hug and blessed week ya'll - and, as always, thanks for reading this far!